Showing posts with label DIY project. Show all posts

Thursday, January 4, 2018

DIY: Button Bag

 
My mom wanted me to sew her a bag for Christmas. I initially did some sketches of bags and picked one that I thought would be simple to sew. I used some fabric I had on hand to sew a draft of the bag. I got about halfway through…and I didn’t like it. So I simplified the design and tried again—this bag I finished and liked.

With my draft finished, I cut and sewed my mom’s bag. The flap can be buttoned in the front or back of the bag. I wanted some versatility, where the flap could be used to help close the bag, or buttoned in the back to make it more open. In addition, since two fabrics are used, buttoning the flap to the back of the bag allows for a different look, with the interior fabric showing.

This is what I did.


—1—
Cut out two sets of pieces, one fabric for the exterior and one fabric for the interior of the bag.

—2—
With right sides together, sew the two strap pieces together. Trim the seams. And turn the strap right side out. Press and topstitch.


—3—
With right sides together, sew the front and back pieces of one fabric together. Trim the seams and corners. And repeat this with the second set of fabric.


—4—
With right sides together, put one bag inside of the other bag and sew the flap pieces together. Trim the seams and corners.

Note: The two sides need to be kept open to turn the bag right side out and to add the strap.

—5—
Turn bag right side out. Try to get the corners as square as possible. Press bag.


—6—
Put a strap end in about 2.5 inch deep into the openings on each side. Sew the strap to the bag. (Sew a square with an X in the middle to help add stability.)


—7—
Sew the openings for the strap down.


—8—
Press and topstitch the bag.

—9—
Mark the position for the buttonhole on the flap. Sew buttonhole. Sew one button on the front side and one button on the backside. Button Bag complete.


Thursday, July 13, 2017

DIY: Voodoo Doll Pincushion


I saw different voodoo doll pincushions online and thought it would fun to make my own. I made voodoo doll pincushions (and travel sewing kits) for Christmas gifts. 

SUPPLIES
  • Felt fabric (I used cream and black)
  • 2 buttons (I used different sizes)
  • Embroidery floss
  • Thread
  • Needle
  • Pins
  • Paper
  • Pencil
  • Scissors
  • Water soluble pencil/chalk
  • Stuffing

DIRECTIONS


— 1 —
Sketch out desired voodoo doll shape on paper. Draw where the eyes and mouth will be. Draw the heart as well.

Note: I added about 0.25 extra space around my initial drawing of my voodoo doll—this was to compensate for the edge stitches on the outside of the doll that took about 0.25 inch. I initially didn’t do this, and I felt my doll looked too “thin.”

— 2 —
Cut out the paper doll. Also draw a heart and cut it out from the paper.

— 3 —
Cut two pieces of felt that is a little larger than the height and width of the paper doll.


— 4 —
Place the two pieces of felt on top of each. Pin the paper doll to the felt.

— 5 —
Cut around the paper doll. Remove pins and paper doll. If necessary, smooth any rough edges of the felt doll pieces.


— 6 —
On one of the felt doll pieces, mark where the eyes, mouth and heart will go. (Keep in mind the space the edge stitching will take up, so don’t get too close to the edge with anything.)

— 7 —
Sew the buttons to the doll. (I used the embroidery floss to add a pop of color.)


— 8 —
With the embroidery floss, sew the mouth. For the horizontal line, I made three stitches across, trying to keep my stitches close together so there was a minimal gap. Then I made about five vertical stitches across the horizontal line.

— 9 —
Using the paper heart as a template, cut out a felt heart. Then cut it in half in a zigzag line.


— 10 —
Place one heart piece on the doll piece and sew it. Repeat for the other half of the heart.


— 11 —
Pin the front and back felt doll pieces together. Use a blanket stitch to sew the two pieces together, leaving an opening of a couple of inches.

— 12 —
Stuff the doll.

— 13 —
Finish blanket stitching the opening. Voodoo Doll Pincushion complete.


This is the completed sewing gift I made. I sewed a simple drawstring bag to put the Travel Sewing Kit and Voodoo Pincushion into. I didn’t create directions for a bag here, as there are many places online to find instructions.


Thursday, July 6, 2017

DIY: Travel Sewing Kit


I decided to make sewing kits as Christmas presents this past year. I wanted to reuse Altoids tins I had for a small travel case.

SUPPLIES Exterior
  • Cotton fabric
  • Felt fabric
  • Steam-to-Steam
  • 3/8 inch ribbon
  • Scissors
  • Glue
  • Iron and ironing board
  • Altoids tin

DIRECTIONS


— 1 —
Cut a piece of felt that is the dimensions of the Altoids tin’s top. This should be about 3.75 inch length by 2.375 inch width. Round the corners to match.


— 2 —
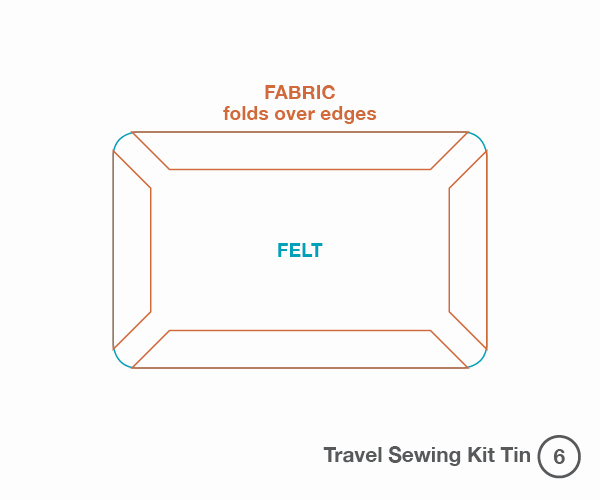
Cut a piece of fabric that’s about an inch longer in length and width to the Altoids tin’s top—about 4.75 inch by 3.375 inch.


— 3 —
Cut a piece of Steam-to-Steam that is about 0.25 inch longer in length and width to the Altoids tins top—about 4 inch by 2.625 inch.


— 4 —
Using the directions of the Steam-to-Steam, adhere the felt piece to the wrong side of the fabric.


— 5 —
Cut the corners of the fabric.


— 6 —
Add glue to the fabric. Carefully fold over each fabric side to the felt. Add extra glue if necessary. Press gently. Let dry.


— 7 —
Add glue to top of Altoids tin. Adhere the fabric felt piece on top. Let dry.


— 8 —
Add glue around the outside of the tin lid.


— 9 —
Carefully place ribbon along the side of the tin lid (to cover where the fabric felt piece and the tin meet). Cut the ribbon when the ribbon overlaps. Add a little bit of glue to the overlapping ribbon. Let dry. Travel Sewing Tin complete.

To fill the tin with sewing supplies, I bought sewing supplies and divided them among the number of kits I was creating. This is for one kit.

SUPPLIES Interior
  • 4 needles (different sizes)
  • 4 pins
  • 4 buttons (different sizes and colors)
  • 2 safety pins (different sizes)
  • Travel scissors
  • Thread (I used five colors: white, black, red, navy and gray)

  • Chipboard (Could use the back of the drawing pad, or food box packaging like cereal)
  • Scissors
  • Pencil
  • Ruler
  • Felt fabric 


— 1 —
Cut out of piece of chipboard that is 1.75 x 3 inch. On the long side, measure and mark at every 0.5 inch (there should be a total of 5 marks). Repeat on other side.


— 2 —
With scissors, cut little triangles out at each mark. I eyeballed this—they triangles are about 0.125 inch deep.


— 3 —
In the middle of the chipboard short end, cut about .0375 inch deep with scissors. Repeat on the other short end.

— 4 —
Wrap the thread around the chipboard, catching the thread between two triangle notches. I wrapped my thread around the chipboard about thirty times.


— 5 —
Then take the thread and put it through the slit on the short end of the chipboard. Cut thread. Repeat this process for the other thread colors.

Note: On the two bottom threads, I used the bottom slit to put the thread through.

— 6 —
Cut two pieces of felt fabric about 1.75 inch by 2.5 inch.

— 7 —
On the first piece of felt, slide four needles though.

— 8 —
On the second piece of felt, slid four pins through.

— 9 —
Put all components of the sewing kit inside the tin. Travel Sewing Kit complete.


Thursday, November 13, 2014

DIY: Spool Banner


When I went thrift shopping with a friend, she bought a bag of thread that had older and newer spools. She just wanted thread and didn’t want the empty wooden spools, and I gladly accepted them when she offered them to me.

Looking at the spools, I thought I could make a cute banner with them. They could be used for place setting names on a table for a party or a special message for someone.

Thursday, October 24, 2013

Thursday, October 17, 2013

DIY: Paper Fan Flower Ornament


This ornament is based upon the Paper Fan Flower I created for packaging decoration. It’s simple and can add a pop of color as a Christmas tree ornament or as party decorations hung on the wall or hung from the ceiling.

Thursday, October 10, 2013

DIY: Glitter Christmas Ornament


Used gift cards are made of a sturdy material so they’re a good base for glue and glitter. This is a simple and inexpensive Christmas ornament to make and I think the glitter helps make it feel quite festive.

Thursday, October 3, 2013

DIY: Paper Circle Christmas Ornament


I realize that Christmas is still somewhat far off (and I know have complained before about how early Christmas paraphernalia starts showing up in stores), but I’ve decided to post a Christmas project anyway (because sometimes you can’t control when you have ideas).

This is a very simple flat circle paper ornament that’s easy to make and easy to personalize.

Thursday, August 1, 2013

DIY: Spiral Wire Necklace


Looking at a spiral notebook one morning, I thought the spiral metal rings created interesting shapes that I could create jewelry with.

Thursday, July 25, 2013

DIY: Hex Nut Beads


I thought I create jewelry using hex nuts as beads. The easiest way is just to use the hex nuts as is and not paint them, but paint them if you want a pop of color.

Thursday, July 18, 2013

DIY: Wire Rope Necklace


While at a hardware store I came across some wire rope that I thought was an interesting material and thought I could create jewelry with it.

I got 10 feet of 1/16 inch size wire rope at 26 cents a foot to experiment with. Regular cutters didn’t work on this wire rope, so I had to get special wire rope cutters (which weren’t particularly cheap), but they cut through the wire rope easily.

Thursday, June 27, 2013

DIY: Mini Accordion Journal


Accordion journals use one long continuous strip of folded paper where the pages can be used individually or unfolded to create larger sections. To create this Mini Accordion Journal, I decided on using used gift cards to create a sturdy cover.

Thursday, June 6, 2013

DIY: Tangram Stamps


After I posted Tangram Magnets, I thought that creating Tangram Stamps would be fun. It’s not hard to create these stamps that can be used as individual shapes or used together to create tangram shape combinations.

Thursday, May 30, 2013

DIY: Tangram Magnets


I loved tangrams as a child; sometimes I’d played with them by myself while other times I played against an opponent. It’s one of those fun yet educational games (that parents like to give their children) as it helps players think and learn about spatial relations.

I thought I’d create Tangram Magnets that you could place on the refrigerator (and play whenever you wanted).

Thursday, February 21, 2013

DIY: Straw Collar Necklace


I wanted to make a collar necklace using Tape Straw Beads that would be bold and graphic. In order to make all of the rows of beads stay together as one piece I used a strip of plastic canvas as a spacer bar.

Tuesday, February 19, 2013

DIY: Tape Straw Beads


I thought using colored tape would be an easy way to decorate “straw beads” that could be used in making costume jewelry.

Thursday, December 6, 2012

DIY: Paper Fringe Napkin Ring


I’ve used toilet paper rolls for napkin rings before in my Fabric Napkin Ring, but this time I decided to cover the toilet paper roll with paper. The toilet paper roll adds extra stability to the paper napkin ring so doesn’t feel quite so flimsy. I chose metallic paper to add some sparkle and a sense of festiveness, and used fringe to create a nice decorative detail.

Tuesday, December 4, 2012

DIY: Flower Banner Card


I thought a simple flower card could be a nice all-purpose card, which depending on the message you wish to give could be easily be used for thank you, congratulations, thinking of you, happy birthday, for you, etc.

For an added pop of interest, I decided to create a banner that is glued to the card and creates some depth and a bit of fun.

Tuesday, November 13, 2012

DIY: Folded Paper Napkin Ring


This is a simple way to create napkin rings that are just made out of paper—no gluing or taping required. They aren’t too hard to make, disposable and inexpensive.

Tuesday, October 30, 2012

DIY: Potato Stamped Cloth Wrapping


Potato stamping is a simple way to create a handmade print. I decided to use this technique to make cloth wrapping for presents.