Showing posts with label reuse. Show all posts
Thursday, March 28, 2019
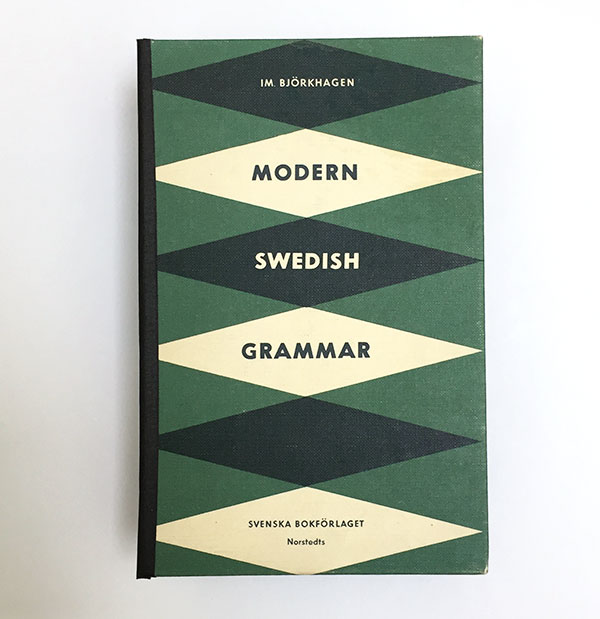
Vintage Book Box
I created boxes from vintage books. I removed the cover from the pages and then cut the spine away. Because the cut edge for the front and back cover pieces looked ragged, I used some black masking tape to cover it up.
I used black foam mat for the box sides. I cut the four sides to the sizes I wanted, and used bookbinding glue to glue sides to the cover and glue the corners together. Once it dried, I used black masking tape to cover the corner edges.
To keep things simple, the box lid is a piece that is placed on top of the box. I cut a piece of black foam board and glued it to the back side of the front book cover piece so the lid wouldn’t slide off the top. The box isn’t the sturdiest of boxes, but it turned out pretty cute. I used the book boxes as packaging for gifts.
This is the second book box I made.
Thursday, November 29, 2018
Skirt Bag
Years ago, I had some wool skirts that didn’t fit me too well, but I liked the fabric so I ripped them up thinking that I would use the fabric someday. That day finally came. I decided I needed a new tote bag since my old one was raggedy and gross, and thought this was a good opportunity to use up that wool fabric.
I had three fabrics from wool skirts to use, a black, a dark gray and a red. I ironed them and measured them to see how much fabric was available to me and sketched out a design for the bag.
I realized that I didn’t have quite enough fabric from my repurposed skirts. So I decided to use some vintage wool fabric my grandmother gave me. The checkered red, gray and cream fabric matched well with my color palette. The one problem was that the fabric had quite a few moth holes, so I had to position my cut outs just right. I barely had enough fabric.
After I had sewn the fabric panels together, I saw that one of the black fabric blocks had a moth hole smack dab in the middle. This was unfortunate as I had already cut the fabric and didn’t have enough to replace the damaged piece. So first I used some thread to sew over the hole, hoping to patch it enough that it wouldn’t expand. Sadly, this looked like a pimple breaking out on a forehead. I didn’t like the way it looked and wanted to cover it up.
So I decided to put a pocket on top of it. Ideally, I wouldn’t have to do this because I wanted the bag to be simple. And quite frankly, I dislike useless pockets. And I’m never using this pocket…for anything. However, it fulfilled its purpose of covering my moth hole. [Sigh.]
The red fabric in the handle wasn’t initially part of my design. However, the black strips of fabric for the handle seemed short to me, and as I didn’t have any more black fabric, I could only use what I had left, which was the red.
When I pinned the straps to the bag, the thickness of the fabric concerned me. I didn’t think my sewing machine would handle it well, so I decided to hand sew it. Unfortunately, my hand sewing skills aren’t very pretty. I used embroidery floss to help cover my poor stitching.
The bag is reversible. At first, I thought I wanted the black and gray side to be on the outside of the bag, but I soon realized that I preferred the red side more. The bag is a bit larger than I anticipated, but it fits everything I need.
Thursday, January 16, 2014
Trashed Tin
Throughout the month of December there was a fairly steady influx of holiday food at work; there were fruit baskets and boxes of chocolates and baked goods, and while some came in disposable packaging, others came in reusable ones.
More than likely, most (if not all) of the packaging got
thrown away. Most of it I wouldn’t have had an issue with it being disposed of
(e.g. anything made of paper). However, one afternoon I opened the trash can to
throw something away and I saw this tin sitting on top of the pile and thought,
“Why is this being thrown out? It’s perfectly good."
I’m not very interested in metal tins in general,
but I thought it was quite wasteful to throw this one out. It’s a fairly cute
and festive tin; it’d be great to use as packaging for Christmas presents or to
hold homemade cookies. So I salvaged this trashed tin, washed off the coffee
grinds from its exterior and brought it home. This coming Christmas is quite a
ways off, but I’ll be ready for it with my “new” tin.
Thursday, December 26, 2013
Label Me
I keep more stuff than I ought to because I often see an item’s “potential”. I generally look at something and think, “I can use this in some way…someday” [although, to be honest I usually don’t get around to using those items any time soon and they just sit around waiting to be used. (Sigh.)] But I finally got around to using some spice jars that had been accumulating.
There are basically two ways to buy spices: in prepackaged bottles
or in bulk. I have bought prepackaged spice jars, in part because of the
options available in a store and in part because of convenience. There are
plastic bottles and glass ones, and while I’ve bought both in the past, I like
the glass ones and tend to keep them. Since I’ve accumulated some glass jars, I
now feel more apt to get spices from the bulk section of a supermarket that I
can refill my jars with.
So I washed my old spice jars out and removed the labels.
Then I used a piece of black linen tape as my base (to create a border) and
placed a white piece of artist tape (with the name already written on it) on
top of it. I think I should be able to remove the white tape if I need to
re-label the jar (or at the very least I could just put another piece of tape
on top of it).
Besides using empty spice jars for spices, they’re good for
holding other small items, like paper clips, tacks and beads—pretty much
anything small or sharp that you want to keep a lid on.
Thursday, October 10, 2013
DIY: Glitter Christmas Ornament
Used gift cards are made of a sturdy material so they’re a good base for glue and glitter. This is a simple and inexpensive Christmas ornament to make and I think the glitter helps make it feel quite festive.
Thursday, August 1, 2013
DIY: Spiral Wire Necklace
Looking at a spiral notebook one morning, I thought the spiral metal rings created interesting shapes that I could create jewelry with.
Thursday, June 27, 2013
DIY: Mini Accordion Journal
Accordion journals use one long continuous strip of folded paper where the pages can be used individually or unfolded to create larger sections. To create this Mini Accordion Journal, I decided on using used gift cards to create a sturdy cover.
Thursday, December 6, 2012
DIY: Paper Fringe Napkin Ring
I’ve used toilet paper rolls for napkin rings before in my Fabric Napkin Ring, but this time I decided to cover the toilet paper roll with paper. The toilet paper roll adds extra stability to the paper napkin ring so doesn’t feel quite so flimsy. I chose metallic paper to add some sparkle and a sense of festiveness, and used fringe to create a nice decorative detail.
Tuesday, November 13, 2012
DIY: Folded Paper Napkin Ring
This is a simple way to create napkin rings that are just made out of paper—no gluing or taping required. They aren’t too hard to make, disposable and inexpensive.
Thursday, October 25, 2012
Cloth Wrapping
Thursday, October 18, 2012
DIY: Scrap Paper Packaging Decoration
I just seem to accumulate different types of paper (e.g. fine art, scrapbooking, cardstock, used wall calendars and paint samples). Sometimes I use these papers in projects and am left with bits and pieces, and I thought I could use those scraps to decorate packages.
Tuesday, September 18, 2012
Needle Earring
As the needle in your sewing machine becomes dull, you're supposed to replace it, and I try to do so after every project or two. So I’ve already thrown away used needles a few times. But a couple of weeks ago I was about to throw one away when I stopped and actually looked at it; it had a nice shape to it and I thought I could use it for something. The eye of the needle could be used to attach it to something and I realized that I could easily create an earring with it.
To connect the needle to a jump ring, I decided on using metal
wire to thread through the eye of the needle; it’s a fairly small hole so I
used a 32 gauge wire to fit through it. I cut a piece of wire about four inches
in length and thread it through the eye of the needle. With the needle about
two inches into the wire, I looped the wire around it to stabilize it and then
created two loops that could be used to connect it to a jump ring. Then I
wrapped each of the wire ends entirely around the needle and I pressed down the
wire ends so they wouldn’t stick out. Finally, I connected the needle’s loop to a
jump ring, and connected that to an earring hook and was finished.
I used more wire than truly necessary to secure the loop,
but I was also trying to make sure that the sharp point of the needle was
underneath the loops of wire. The earring is simple as-is, but I think it could
be interesting to add some other elements to it (like beads or charms). But
overall I think it’s a nice earring and a good reuse of something I would’ve
otherwise thrown away.
Tuesday, June 26, 2012
The Earring Pendant
Sometimes you just lose an earring; you come home and realize that at some point during the day, you lost it and have no clue of where it could be. You may try to check your home or car or office, but usually, it’s just a lost cause…it’s gone forever. When this happens, I always keep the lone earring I have left in the hopes that I can reuse it in some way.
A lone earring makes for a good charm or pendant for a
necklace. My earrings tend to have hooks (rather than studs), so it’s pretty
easy to disconnect the dangling part of the earring from the hook. And then I
just reattach it to a chain and have a new piece of jewelry to wear.
In this necklace, the long metal rectangle piece used to be
part of a set of earrings I had. I made a simple necklace using that earring piece
as the main pendant that hangs from a bead, and decided to add a bit more
visual interest by using two chains on either side of the pendant. I was glad I
could find a way to use this lone earring in a new necklace that I like quite a
bit.
Subscribe to:
Posts (Atom)