

Creating fringe is an easy way to add some texture and visual interest to plain colored cardstock; I used this simple technique to make a gift tag with.

SUPPLIES
- Colored cardstock
- Scissors
- Double-sided permanent tape
- Pencil
- Ruler
DIRECTIONS
— 1 —
Cut a rectangle from the cardstock. (Mine is 4.5 x 2
inches.)

With scissors, cut the bottom corners off. (My cuts start
from the bottom center of the rectangle to about 1.5 inch up the sides.)
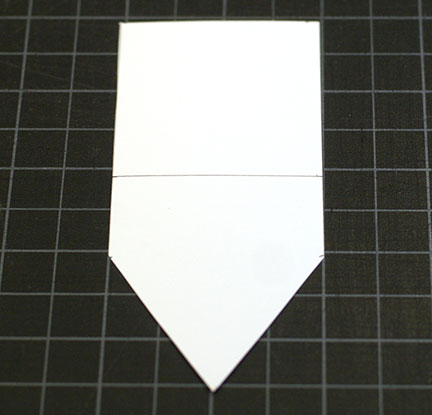
On the back of the cut rectangle, draw a line with the
pencil near the middle of tag. (My line is about 2 inch from the top.)
Note: This line
acts as guide. When cutting the fringe, you want to cut to this line.


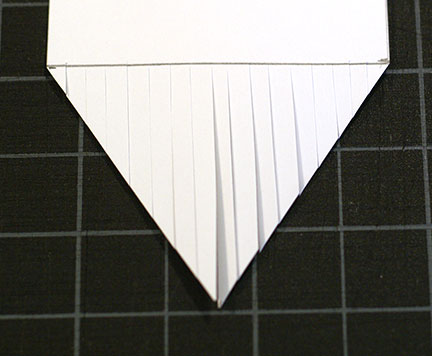
With scissors, cut from the bottom of the cardstock to the
drawn line. Repeat until the fringe is complete.
— 5 —
Cut a second smaller rectangle from the cardstock. (Mine is
3.75 x 2 inches.)

With scissors, cut the bottom corners off. (My cuts start
from the bottom center of the rectangle to about 1.5 inch up the sides.)

On the back of the cut rectangle, draw a line where the
angled cut ends. (My line is about 2.25 inch from the top.)

With scissors, cut from the bottom of the cardstock to the
drawn line. Repeat until the fringe is complete.

Write your message on the front of the smaller cut
rectangle.

On the front of the larger cut rectangle, place double sided
permanent tape onto the unfringed section of the paper. Adhere the smaller cut
rectangle onto the larger cut rectangle.

With scissors, cut the corners of top corners off. (Mine is
about 0.5 inches off of the width and height.)

Adhere the tag with tape onto a package. Or if you prefer,
punch a hole at the top of the tag, thread a ribbon and knot ends; tie tag to a
bag. Paper Fringe Tag complete.

No comments:
Post a Comment
Note: Only a member of this blog may post a comment.