

In one of my art classes I had to make “wearable art”. This was not to be confused with a costume (e.g. pirates and princesses). No, this was something constructed using any materials we found fit and it could look like and be anything.
I wanted to make something that was akin to clothing. The format came to me first, and I decided to use plastic canvas and yarn to construct a “dress”. The concept of the “dress” was water; I used three different shades of blue and wanted it to have a sense of flow and movement. The actual construction part was a long and tedious process. The plastic canvas was the central piece that bound everything together; there was one sheet in the front and one in the back and all of the yarn connected to it.

I don’t have any photos of the actual “dress” (since I threw it away during some “spring cleaning”) but this sketch should give the general idea of its appearance. It made me a bit sad to get rid of the “dress” since it took such effort to create (but I just didn't have the room to keep it). Yet I suppose this wearable art project lives on as the inspiration in this woven (yarn) jewelry project.
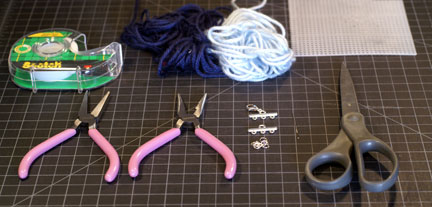
SUPPLIES
- Plastic Canvas
- Scissors
- Yarn/Ribbon/String
- Tapestry Needle
- Tape
- Jump Rings
- Clasp
- Pliers

— 1 —
Cut out the basic shape you want from the plastic canvas. (Mine was a rectangle long enough to go around my wrist.)

With your scissors, smooth out the edges of the plastic canvas shape.

Tape the end of the yarn (to make it easier to thread). Thread the yarn through the tapestry needle. Cut off the tape from the yarn end.

Pull out a length of yarn (so you have enough to weave your design). Weave your needle in and out through the plastic canvas in any way you find pleasing.


[To create a yarn border: On the outside hole, put your needle through the same hole again and pull taut.]

— 5 —
Once finished with weaving the yarn, cut the end and knot the ends together. (I wove my yarn back to where the yarn originated so it was easy to knot the two ends together.)

[Add more colored yarn if you so desire.]
— 6 —
When you’re done weaving the yarn design, open the jump rings with pliers. Put a jump ring through one of the holes at the end of the bracelet (this may be hard to see if you used yarn, but it’s doable).

— 7 —
Attach the jump ring to the clasp. Close the jump ring. Repeat attaching jump rings until the clasp and plastic canvas are linked together. (I reinforced the link by using two jump rings per hole.) Woven bracelet complete.
Note: I made this bracelet using one long rectangular piece of plastic canvas, but it does create a fairly stiff bracelet. You may prefer to cut up the plastic canvas into smaller pieces, and then you can attach the pieces together using jump rings or weaving the yarn through the multiple pieces.
No comments:
Post a Comment
Note: Only a member of this blog may post a comment.